
This is a pseudo-novice guide for installing Qubes OS on an Lenovo X250.
July 2019, I just finished translating the Autobiography of Edward Snowden into Japanese. Of course, this makes you paranoid. You start to suspect NSA behind everything, and you tape over your webcam in your computer. Also, you really start tightening your security, like using password managers, not encrypting but at least signing your mail with PGP. And then, I decided to look into Qubes that Snowden recommended.
Now, I've looked at several Qubes installation guides, but since this really is an OS for people who actually know what they are doing, many such guides are quite technical. I'm not a complete novice (although no Unix wizard or anything), but still, it's a totally new environment, and many of the infos that I needed was hard to find, or written in an uninviting manner, so I had to find things out the hard way.
So I decided to record what I did on the way, to provide some info about how to get started.
0. Intro
Since you're here, I assume you already know what Qubes OS is. If you don't, see below.
Basically, it's a high-security operating system. The problem with most OS, such as Windows or MacOSX or Linux is that all parts of the system are rather tightly interconnected. When any part is compromised, crackers and malwares can bore into other parts of the system. Qubes avoids this issue by creating virtual machines for various tasks. Any compromise within a VM stays in the VM, and cannot access or affect data or configuration in other VMs. It's pretty interesting.
I decided to give it a try. I had an old Lenovo X250 lying around, and looking at the hardware compatibility list, it seemed to be usable.
0.1 Is Qubes difficult? Do you have to be fluent in Linux?
I'd say yes, or at the least, somewhat.
I've seen Qubes docs or FAQs that claim you don't need any prior experience in Linux or BSDs to install and use it. This depends a lot on what you mean by "install" and "use". IF (big if) you don't encounter any problems during the installation, then yes, a person with no experience may be able to install it. If you're a total novice, but you only want to do web browsing or very basic text editiing stuff in gedit or (god forbid) vi, then you don't really need any experience with Linux etc.
But if anything goes wrong during the installation, you need to try some tweaks. If you want to add new software, use Qubes for regular use, then you need to know what rpm and deb files are, and how to handle them. None of the Qubes documentation would tell you the difference between Fedora and Debian, much less about yum/dnf or apt. If you don't understand what those are, you have a lot to learn.
It does come with some application pre-installed, like web browsers (Firefox and Tor Browser) and mailers (Thunderbird). But apart from the web browser, you need to call up the applications through CLI. So be prepared to type in commands, even after the setup is over.
0.2 What level of a machine would be needed to comfortably use Qubes?
I can't say I tried a lot of machines, but based on my experience with X250 (i5, 8GB RAM, 500GB SSD), I would say this is a minimum bearable configuration in terms of response. Screen size is another issue. X250 has 12.5 inch 1366 x 786 LCD. Probably, this would feel quite small, unless you are a true minimalist.
On the Qubes site, there is a requirement, as well as a hardware compatibility list that shows which machines had success with Qubes installation. The problem is, there is a difference between installable and useable. Just because you can install Qubes on a machine doesn't mean it would be comfortable to use.
While it is possible to run Qubes in a standard X250 configuration (8GB RAM, 500GB HDD), it was quite slow. Qubes uses a lot of virtual machines (VMs). It's like doing everything on VMWare or Pararelles. There's considerable overhead, requiring CPU power, as well as a lot of access to the disk. With the standard configuration, I try to open a new software (say, a web browser) in a new domain. It takes a while to open the domain's VM, and then some more to open the application. By the time it actually opens, you're already moving on to something else, when this browser window appears our of the blue.
Switching to SSD speed things up significantly. It still wouldn't become anything near snappy, new browsers in different domains take time, but not as long as HD. With HDD, by the time the application actually opens its window, you've almost forgotten that you asked for it. With SSD, at least you still remember your order. Smaller ones (250GB) are really cheap these days, less than USD100.
I'd imagine that increasing the RAM to 16GB would also help. But the price of a 16GB SODIMM DDR3L PC3L-12800 cost almost as much as a used X250. Didn't seem to justify the investment.
The big issue for me is the screen size. Qubes uses multiple domains. Each domain is a separate world. In my case, this means that I have to have separate instance of the same application in each domain. I'd have a web browser in each domain, as well as a mailer, terminal, maybe office suite, text editor. While this is a feature, it does mean that you would need more windows open than a simpler OS. For me, 12.5 inch just doesn't work beyond experimentation and simple use.
On the Qubes page, there is a certified machine, which is an X230 with i7, 16GB RAM, and SSD. Apart from the screen size, this sounds great. I guess the reason they use X230 as their base is because it's MUCH easier and cheaper to increase RAM, easier to mod in various ways (I replaced the keyboard on X250; it was hell), and the Heads Open source firmware. This does seem like a lot of fun... but that's for another day.
1. Getting started
1.1 Update your BIOS (and chip firmware)
When still in your Windows environment, update the BIOS and chipset firmware to the latest versions. This is NOT the Windows Update. You need to use Lenovo's update utility in Windows, or check Lenovo's page for the lates updates.
Yes, you CAN update the BIOS afterwards, but bit of a hassle. Not that this saves any problems. I've read some people reporting that installing Qubes went without a hitch on an X250. I hoped that with the latest BIOS, I could get the same deal.... No such luck. But still, having the latest firmwares and BIOS never hurts.
1.2 Create a bootable USB
You need to download the iso image of Qubes4.0, and wright that on to your USB drive using softwares like balenaEtcher. Of course, there are many other software to write an iso image to your USB drive. Shouldn't make any difference.... except, sometime it does. I used a Mac, and the older version of Etcher never wrote anything to the USB disk. So if you're encountering problems at this stage, check if your software matches your OS version, update or try another writing software.
Here's the writing window for my Etcher (mac version). It should be intuitive enough. Select your iso image, select your medium (USB Drive), and let it do its thing.

2. Changing the BIOS Setting
Reboot your X250.

When the logo shows, press Enter and go into the startup menu.

From there, select the F1 key to go into the BIOS Setting.

2.1 Turn off Secure Boot
First, you need to make your machine bootable from the USB drive. Use the arrow key <-- -->to move among the menu, and select "Security".

Within "security", go to the bottom item, "Secure Boot", and disable it.

Press ESC to go back.
2.2 Allow hardware memory controls
Qubes use memory virtualization to swich between the virtual machines. Within the "Security" menu, select "virtualization". Enable both items.
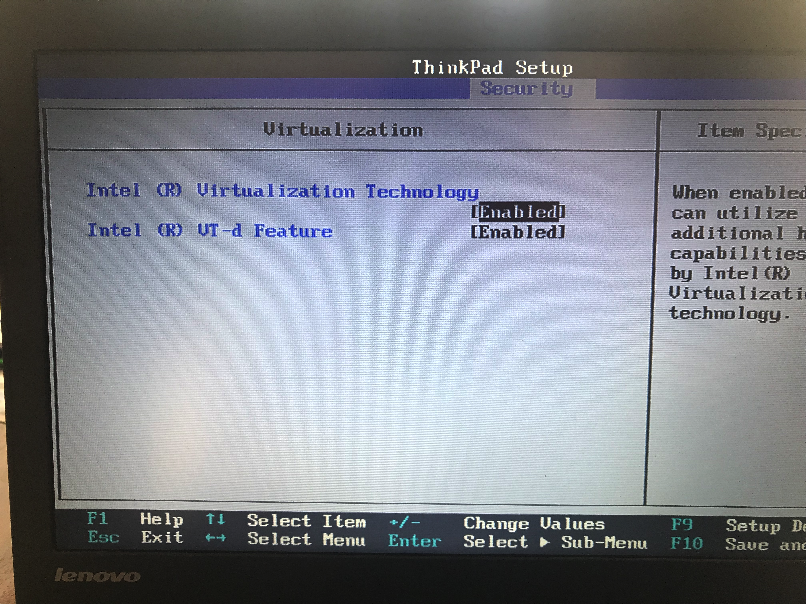
Press ESC to go back.
2.3 Check the security chip (TPM) setting
Qubes uses TPM 1.2 mode. Within the "security" menu, check TPM if its in TPM 1.2 mode. The "Discreet blah blah" is the right one.
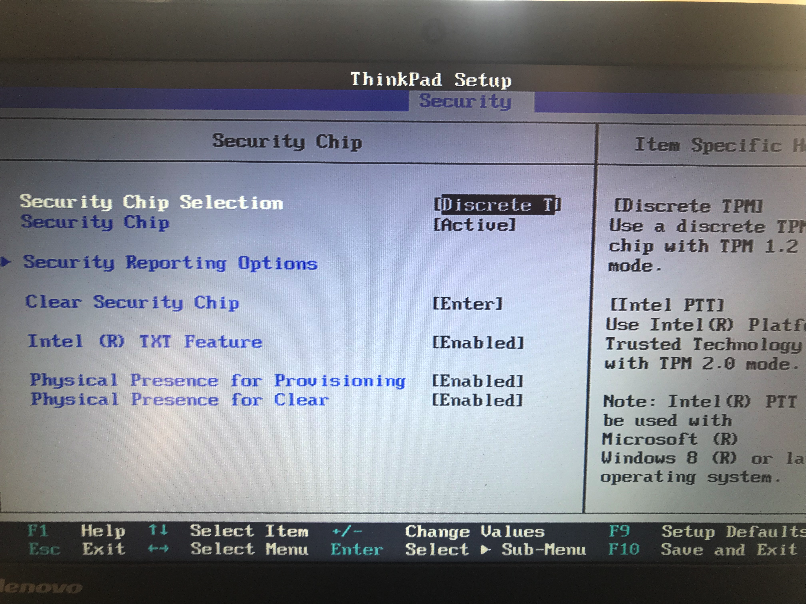
2.4 Done!
That's it for BIOS settings. Choose F10 to save.
3. Installation
3.1 Boot from the USB drive
Reboot your X250, with the USB stick inserted. At the startup, press Enter. In the menu, select F12 boot item, and choose the USB stick.

Lines of tiny letters should start to appear. The installer is loading and doing its thing. So just wait. The process should take about 30 seconds.
3.2 Configure installation setting
Hopefully, you've arrived at the language selection screen.
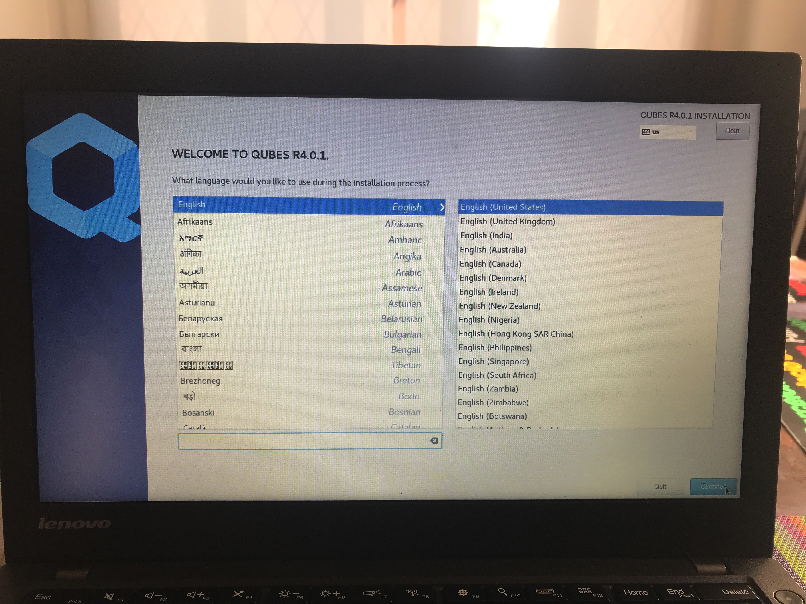
Here, just choose the language you want. Now you're at the installation screen.

You need to get rid of the Exclamation mark on the "Installation Destination." So click on it.

Yikes the picture's ugly. I am going to dedicate the whole disk to Qubes. I will simply erase what used to be there. Maybe dual boot is possible, but I don't think there's much of a point to do that for a security oriented OS, and besides, HDD (even SSD) are cheap. So, I will choose "Automatically configure partitioning", and also check "I would lie to make additional space available". This means that your old partitions will be erased. Click "Done" on the top left side.

It will show the disk structure, and ask whether it can delete the existing partitions. Choose "Delete All" on the right hand side, and then click "Reclaim space."
The installer will ask you for the Disk Encryption Password. Choose whatever you want, and click "Save Passphrase". Don't forget it!
You will come back to the installation Summary page. While you're here, Adjust Time & Date to your time zone, and adjust the time. Tor uses the system clock to connect with the network, so when it's off too much, it won't be able to connect. Make sure you select the right time zone, and adjust the clock on the bottom left.

Add extra language through "Language Support." I'm not sure what this does. I was hoping that this takes care of the input methods, but it doesn't. Maybe it installs some fonts?
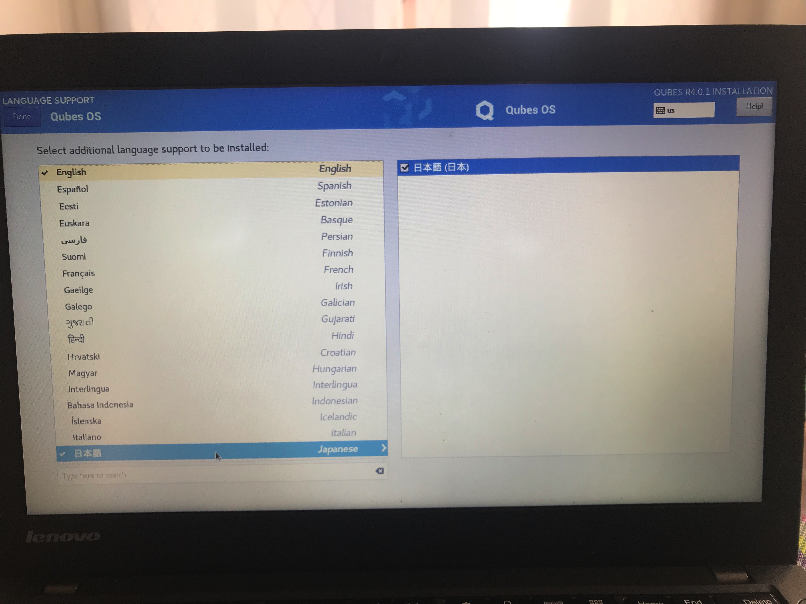
OK. That's it. Click "Begin Installation".
3.3 Wait and create your account
The installation takes quite a while. Be patient. It would take less than it needs to re-compile a linux kernel from scratch.

During this period, you would want to set your Administrator account and password. Click on the right hand side to set the user. It's the only user you'll be, so try not to be too juvenile in the name selection like me.

Once the installation is over, DO NOT CLICK REBOOT!! You have to complete the next step.
3.4 Modify xen.cfg
When you look at various installation reports for Lenovo machines, some report that everything went without a hitch, while some report problems after installation. Mine did. Specifically, after installation, when the machine reboots, it shows a bunch of lines showing that the software is running, and then.... the screen turns blank.
This happened in BIOS 1.27 and 1.34.
In order to make it proceed, you need to modify the configuration file. The instructions are written here, but it's buried within many other instructions, so it's had to find. I will break it down.
- Type "Ctrl-Alt-F2". Remember that in order to get to F2, you need to press the Fn key also!! So it' actually "Ctrl-Alt-Fn-F2" (it's those little things that gets you). This will get you to the tty console.

- Edit /mnt/sysimage/boot/efi/EFI/qubes/xen.cfg, using the (dreaded) vi editor. The last time I used vi, many of the readers probably weren't born yet. So I'll break it down.
First, open the file with vi with the following;

The file opens inside vi, and you can move the cursor around with the arrow keys, but you won't be able to add anything.

Type "i" to get into the insert mode.
Add the following 2 lines to the end of the file.
mapbs=1
noexitboot=1

The link above says;
Note: You must add these parameters on two separate new lines (one parameter on each line) at the end of each section that includes a kernel line (i.e., all sections except the first one, since it doesn’t have a kernel line).
In this case, you just need to get the 2 lines at the very end of the file. Hit the ESC key. This will get you back to the command mode of vi.
To save the file and quit vi, type;
:wq
Now, you should be back at the console. At the prompt, type "reboot" and let the system reboot.
By the way, I'm not sure what these 2 lines do. I might figure it out some day....
4. After Reboot
4.1 First time after the installation
Once you reboot the system, it should restart. It will pause a bit after the initial rows of text, but be patient, and several Tux the Penguin should appear on top of the screen, with further lines of very small lines.
The screen goes black, the Qubes logo will appear, and it will ask for your encrypted hardware password, so go ahead and enter it.
And then, hopefully, you'll get here, the Initial Setup screen
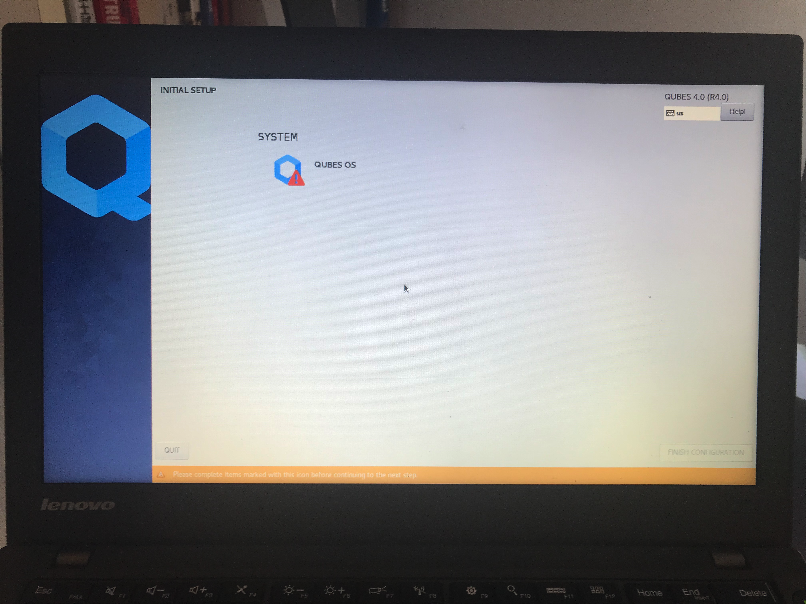
Go ahead and click the "Qubes OS" thing with the exclamation. It will ask you about the installation, like this.
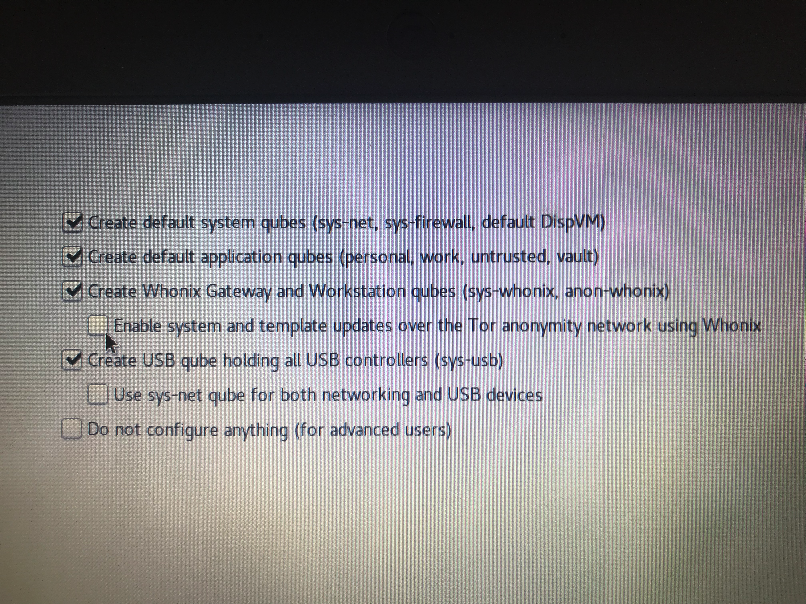
You are a novice, so you can just leave everything as is and continue (but poking around won't hurt). If you understand what it's asking for, and you have the ability to make your own judgement on the items, probably you don't need this installation guide.
It will do some further setup (takes another five minute or so), and then, you're back to the Initial Setup screen. DON'T CLICK THE "QUBES OS" thing again!! It will just send you back to the configuration that you just finished. On the bottom right, there is a "FINISH CONFIGURATION" Button (red circle). Click that.

Hopefully, you get to the login screen.
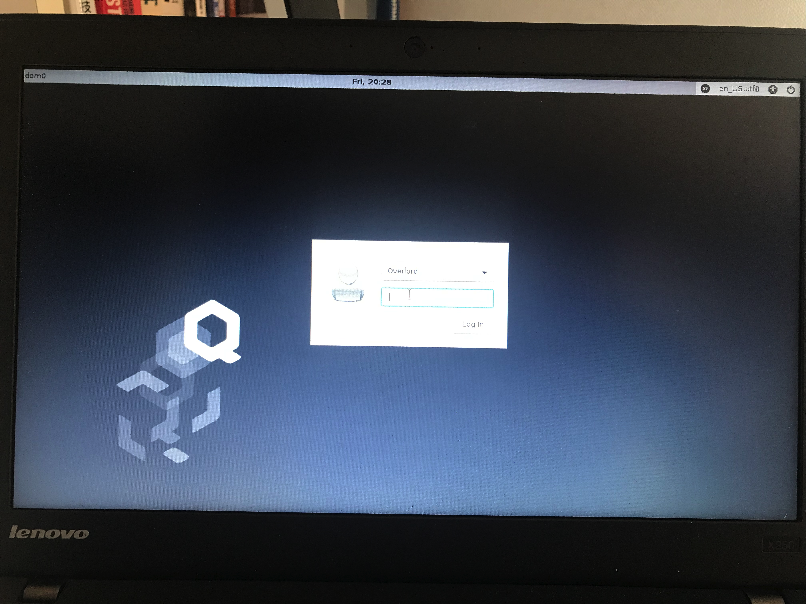
Input your password, and you're in!
4.2 After logging in
So welcome to Qubes. This is what your screen would look like. It's so bare, I clicked on the top left icon to display the menu.

Anyone used to any other OS, including ubuntu and other Linux variations would feel.... kind of limited. There are web browsers. You could open the terminal, and type some commands. Also, if you type "gedit", you'll have a text editor. But I can't input Japanese, and do other stuff. There are no hoards of applications in the menu, nor are there bunch of icons on the desktop.
So let's start with some housekeeping stuff. First, check if your function keys work. Volume up/down, screen brightness, keyboard backlight should all work. Next, go ahead and connect to the wifi. There are bunch of icons on the top right side of the screen. One of them handles the network. Find it, connect to the wifi, or connect your Ethernet cable. There shouldn't be any problems there. USB and SDcard slot works. If you open a web browser and go to Youtube, video and sound also works. Great!
The Webcam and fingerprint sensor doesn't seem to do anything at first, but don't worry. We'll take care of them later. These are minor issues for the moment anyway.
4.2.1 You cannot add a new user.
After logging in as administrator, a normal instinct for a Linux and BSD users would be to create a regular user, and use that as your everyday account. Qubes users would be more security conscious than others, so I imagined this is what everyone would do. But I couldn't find any setup or menu for user management. So I looked around.
It turns out that in Qubes-OS, you don't do this. Qubes is not a multi user system. The only account you use is the administrator account that you created during installation. There's no regular user account. Well, not quite. It seems that there could be, since at the login, it seems possible to choose users. But how to add those users, I have no idea.
It took me 30 minutes to arrive at the link above, to finally confirm that you really don't create new users in Qubes.
It came to me that, in a sense, quite a lot of security could be achieved by properly setting up many users with proper permissions. However, since many people are lazy and just do everything as admin, this security model doesn't work. So, instead of having many users, Qubes is setting up many VM/Domains, while limiting the number/kinds of users. But this is just an idea.
4.2.2 Looking around Domains
From the (limited) menu, try and get the web browser (firefox) from each of the domains, like "Work" and "Personal". See that both browsers are independent, and if you add bookmarks to one, it doesn't affect the other.
One of the things that you will immediately find out is that the separation of "work" "personal" etc. isn't as clear as you thought it would be. Cookies are not shared, but If you log into Amazon in both "private" and "work," or use the same gmail/google account for both domains, The separation of the domains become blurry.... but that's a very different and difficult issue. I won't go in there just now.
4.3 Input Methods (Optional)
If you're fine with just English, great. I'm Japanese, and whatever I do, I would need Japanese input. I guess there will be other users of other languages. Display is OK, it already has Japanese and Chinese fonts. But input is another matter.
How to add language input is explained here. This just covers Chinese using ibus, but the deal is the same with Japanese (and other CJKV etc stuff).
So let's actually do this. First, open the template VM. The pre-configured domains ("Work", "Personal" etc.) is created using Fedora. Therefore, you will first open the Template VM for Fedora. Choose "Template: fedora-29 --> fedora29: Terminal".
In Fedora, to add software, you need to use rpm. This is a package management system. Softwares rely on other software to run properly. RPM is a package that knows which other software it needs. And then I noticed that you no longer use raw rpm commands, or even yum. Now they use dnf. This is a larger package management system that automatically looks for the necessary packages, checks for any conflicting ones and makes things really easy.
There are many input methods for Japanese, and also, I remember a lot of heated discussions between ibus and fcitx, but I'm not sure where the consensus is now. In either case, fcitx is not available from the fedora dnf repository, so it's a moot point. For now, I just go for ibus-mozc.
Type the following;
sudo dnf install ibus-mozc
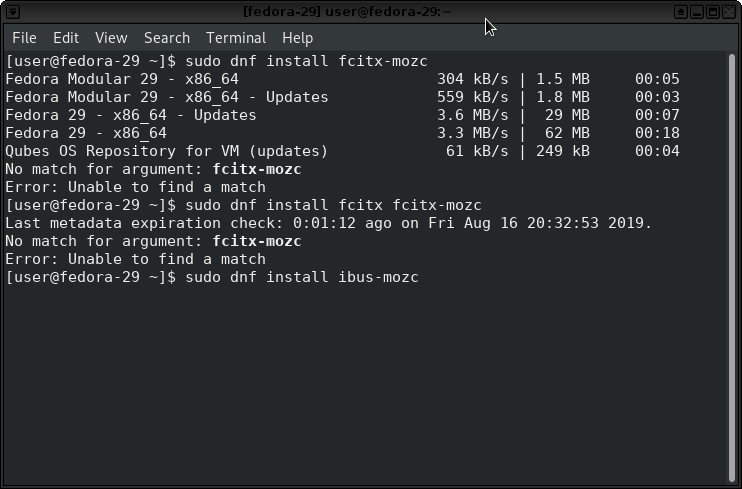
Just say "y" to everything.
BTW, "sudo" means that you have to be a superuser to run this command. dnf is the package manager that can alter the deep core of the system, so people use this command should know what they're doing.
Now, you need to go and restart the fedora-29 TemplateVM. Go to the menu, choose "System Tools --> Qube Manager."

In the Manager, right-click on the fedora-29 TemplateVM. Choose "Restart qube".

Now, open a domain. Personal, maybe? Open a terminal, and type
ibus-setup
From here, it should be obvious, but select "input method" and add mozc under Japanese. You will have an icon in the tool area in your toolbar. Click that, and you can configure it.
One thing to understand is that because of the separated Domain structure, you need to do this for every domain. As a result, when I use Japanese input in different domains, the Panel (the bar on the top) shows multiple icons for ibus, one for each domain. It does seem cluttered. Maybe it's better if there was one global ibus for the whole system.... although I can also see that this may cause contamination between the domains.

In order to get ibus-mozc to start automatically for each domain, you need to add some lines to ~/.bashrc, which is a script that runs at the beginning of that domain/VM. I had problem automatically starting the daemon, but the answer was easy; just tell it to start in the .bashrc! So instead of the 3 lines mentioned in the semi-official docs, make it 4 lines to make it start (tnx, the person behind nantoka.net!!)

For people who are too lazy to even type those 4 lines, here they are for your copy&paste enjoyment;
export XMODIFIERS=@im=ibus
export QT_IM_MODULE=ibus
Restart the Qube/Domain to see its effect. Now the ibus-daemon should automatically start.
I still can't get it to remember the input mode and other configuration that I made to mozc, so I have to re-configure it each time, but tI'm sure there is a solution to this also.
4.4 Starting and Installing other software
Some software come pre-installed. They just don't have the nice icons on the screen. You need to access them from the command line. For example, to start the mailer, Thunderbird, first, open the terminal. And then type;
If you are wondering, the & at the end tells the bash to return the prompt. Otherwise, there will be no prompt until you quit Thunderbird. Configuration of the mailer is the same with any other OS.
But what about other software? This is where people who don't read documentations (i.e., all of us) get confused.
For example, let's try LibreOffice. First, try to start LibreOffice from the terminal command line.
this is not installed yet, so there will be a message saying that there is no such command. So, you need to install it.
4.4.1 The WRONG WAY
Linux users as well as others, think that you can simply install your own software right there. As mentioned when I touched upon the Japanese input, pre-configured Domains/VMs are Fedora based, which use RPM for package management. Therefore, installation of new software uses dnf. You would simply type the following at your "Work" domain to install LibreOffice:
sudo dnf install libreoffice
Say yes to anything it asks.
Once this is done, you can go to the terminal prompt
This seems to work. LibreOffice starts, you can create documents.... but then, you realize that you cannot save them. Also, once you close the domain and re-open it, you can't start your LibreOffice. It's no longer there.
4.4.2 The CORRECT WAY
The correct way is in the documentation, but it's longish.
The idea is, you have to install it in the TemplateVM, and then start it in your whatever Domain.
So, you will first open the Template VM for Fedora. Choose "Template: fedora-29 --> fedora29: Terminal".
Type the following;
sudo dnf install libreoffice
Just say "y" to everything.
Now, you need to go and restart the fedora-29 TemplateVM. Go to the menu, choose "System Tools --> Qube Manager."

In the Manager, right-click on the fedora-29 TemplateVM. Choose "Restart qube". While your at it, restart "work" or whatever domain you want to use also.

Now, go to the domain you want to use and type
OK, now the app opens, you can create and save you docs.

4.5 Using the built-in Camera (and other devices)
I'm not quite sure about these. Initially, the camera (and what I THINK is the fingerprint scanner) wasn't there, but then, after a while, the machine told me it detected them. Maybe there are some tricks. I don't know.
But once they are detected, you can use them. This, too, requires some un-intuitive moves.
In the "Work" domain terminal, try to open an application that uses the camera, like Cheeze. It's pre-installed.
cheese &
It will tell you that it can't find the camera device. Just close it.
The point is, you have to attach the device to the specific domain. Qubes-OS doesn't want a device to have global access to every domain /VM. You need to specify which domain would be using the device.
The official documentation is here;
Yeah, it's long again. To sum up, in the toolbox, there is an icon that looks like a desktop machine. click it, and you'll get a list of devices, including the camera. Add it to the Domain that you are working in (for example, "work").

Now, go back to the "Work" domain terminal, and start Cheeze again. Now, it should be able to find the camera, and your nerdy face should show up on the screen.
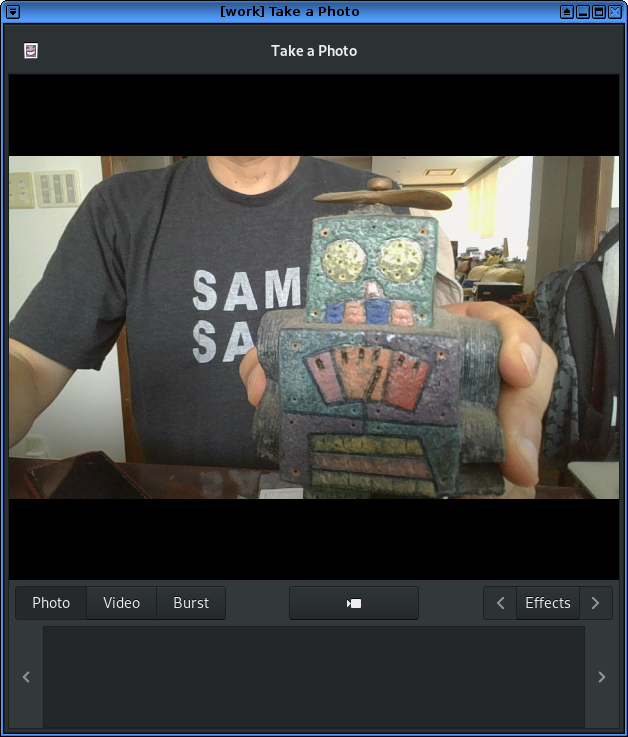
I think the other devices there represent the fingerprint reader, but I haven't tested it yet.
4.6 Fonts
For many Japanese people, the first impression after installing Linux is "this is kinda un-sophisticated". It is very often a deal breaker for them. One of the largest reason for this impression is the font. Japanese fonts, under default, seems unclean. So, you should install good free fonts.
There are many to choose from. Sorry for the Japanese link, but the below ling provides many samples and links to them.
The way to install them to Qubes is the same. Do dnf at each of the template you want. For vlgothic, ipa and Noto fonts, do like this;
sudo dnf install ipa-*-fonts
sudo dnf install vlgothic*
sudo dnf install google-notojp
(if you just do google-noto*, you'll get a huge assortment of fonts, including Arabic, Tamil, languages that you never heard of and some more. The total will exceed 2GB, so you'd better pick and choose what you want!!!)
I'm not sure if I really need to install fonts separately for each template, or whether I can install fonts globally and use it among all VMs. I need to look around further.
Setting these fonts as your default would make life more comfortable. The window titles currently cannot handle Japanese; would I be able to correct this with my locale setting? I also need to look into this.
To be Continued...
So here you are. You successfully installed Qubes4.0 on an Lenovo Thinkpad X250, managed to come so-so far. Web browser, mailer, office suite, and Japanese input was achieved. Great. But still, I'm hung up at some very basic stuff, like saving my configuration for mozc Japanese input. This would require some figuring out.
At this point, you can actually have the applications you want on the system, so you can actually start to USE it, instead of just being an installation tourist. And once you start to really use it, then finally, issues like copy-paste between domains, moving files between domains, would become a real issue. But at this point, these issues are not complete deal breakers, just some nuisance on an unfamiliar system. You would have patience enough to read the official documentation.
As mentioned, this whole Qubes OS is interesting, but really makes you wonder. For example, I have Firefox in all the domains. Firefox has the ability to have a user account, where bookmarks and extensions are shared. Is it OK to use this function? If you share your extensions and bookmarks between domains, does that defeat the whole point of Qubes? How about YouTube accounts or Amazon shopping?
Eventually, I would want to have a WindowsVM, which should make things significantly useable.....but I seem to have a long way to go.
So here's my experience. Of course, I'm sure I'm doing something really appalling, or missing some really obvious stuff. So if you have any advice or suggestions, pls let me know!!
Hiroo Yamagata (hiyori13@alum.mit.edu)
Note (2019/08/18)
I had comments that this is not a bullet proof solution, truly security-consicious people would never share accounts among domains etc. I totally hear you. But, the point about security has always been that people are never ALWAYS security conscious. We slip, share accounts, use the same password, even if you are tinfoil-hat-conscious about security. We need to have a security/threat model that works even if we're not doing anything about it. With more people using something like Qubes, surveillance becomes more difficult = unfeasible. Enough "unfeasible" should become "Ïmpossible." I think that's the most we can hope for.